Chapter 9 Protocol Me, Maybe
Introduction
The Internet is an extremely heterogenous environment. Not only do a huge variety of devices using different hardware components need to be able to communicate with each other over the Internet, but there’s also a good chance that those devices are powered by different operating systems and software. In order for different devices to talk to each other, they need to agree upon some standardized way of communicating. That way, even if networked computers are running different hardware and software, they’ll be able to communicate because they’re all following the same rules and method of communicating that were established by a formal, explicit protocol.
Protocols
We obey plenty of protocols in our everyday lives. For example, when you meet someone new, you might say hello and extend your hand. Your new friend might then then say hello back to you, grab your hand, and shake it. After a few solid shakes, both of you will release the other’s hand, and perhaps you’ll begin to talk about the weather. After all, Cambridge is really nice this time of year. Even if you’ve never met this person before, you both obeyed the same standards of behavior. Because society has established the handshake protocol, both you and your friend knew exactly what to do without any additional instruction. Networked computers have essentially the same goal: even if two computers have never communicated before, there needs to be some way of exchanging information in a way that is agnostic to the software running on both devices.
We’ve actually already seen a network protocol in action. Remember DHCP? Turns out the “P” in DHCP indeed stands for “protocol,” which is what we’ll be focusing on now. In case you forget (heck, I sure did), DHCP is the process through which your computer obtains an IP address so it can communicate over a network. Ideally, we’d like any type of computer to connect to the network, whether that computer be a Mac, a PC, or a mobile phone. However, we’ve seen that these devices may be running different operating systems, all of which could have their own way of doing things. So, all of these different devices need to agree on some sort of procedure that they’ll follow regardless of the software they’re running. DHCP is simply an agreed-upon, standardized set of steps that all devices that want to connect to a network will follow.
We’ve already seen how DHCP works at a high level, but let’s review the protocol’s steps in more detail.
-
The client wishing to connect to the network broadcasts a DHCPBROADCAST message to the network in order to locate the network’s DHCP servers.
-
A DHCP server receives the broadcast and responds with a DHCPOFFER message, which assigns the device an IP address. This message contains an IP address for the device to use on the network, the amount of time that IP address is valid for, and the IP addresses of DNS servers on the network that the device should use to resolve domain names, listed in order of preference.
-
After the client receives the DHCPOFFER, it sends the server a DHCPREQUEST message to request to use the IP address. This request contains the same IP that was assigned in the DHCPOFFER.
-
Finally, the server responds with a DHCPACK message, which acknowledges that it has received the request and completes the DHCP process.
As you can see, the steps of the DHCP protocol are very formal and clearly defined, but they’re not designed for any type of hardware or software in particular. Instead, the people writing the software for Macbooks and iPads simply have to follow the steps that DHCP sets out, and then those devices will be able to connect to any network using DHCP.
HTTP Requests
Alright, now that we have a handle on what protocols are, let’s take a look at a protocol your browser uses every day. We’ve talked about accessing data on CNN.com, but we haven’t really said anything yet about what a request to CNN or a response from Wolf Blitzer actually looks like. While DHCP defines a set of steps for devices to follow when connecting to a network, HTTP, or hypertext transfer protocol, lays out a process for requesting web page data.
Typically, HTTP communication happens between two devices. Recall that one of these devices is called the client, which is the computer that’s requesting information from some other computer. These requests usually come from a web browser, which is the program that you use to browse the web. Today, popular web browsers include Google Chrome, Mozilla Firefox, Apple Safari, and Microsoft Internet Explorer. On the other end of the request is a server, which is simply the name for a computer dedicated to powering a website. Web servers run specialized software that is designed to handle web requests, and modern web servers may use programs like Apache and nginx.
Let’s first take a look at what goes into an HTTP request. Based on the links you click and what you type into the address bar, your web browser will create HTTP requests behind the scenes, so let’s go ahead and take the hood off that process. HTTP requests are written in plain text, so they’re easy for us humans to read and write. Here’s what an HTTP request I might use to head to my Facebook news feed:
GET /home.php HTTP/1.1
Host: www.facebook.com
This might look a bit cryptic at first, so let’s break this down a bit. The first word, “GET” is the HTTP method, sometimes called the HTTP verb, which describes the action the request is performing. Here, we want to get some data from Facebook’s homepage, so it makes sense that we’d want to use an HTTP GET method. HTTP specifies that these methods should be written in ALL CAPITAL LETTERS, so don’t worry, I’m not yelling at you. Next is a single space, which is also specified by HTTP and not something that I just added for readability. After the space is something that looks like a URL. This isn’t a complete URL, since it’s missing a few necessary parts at the beginning, but it does contain the path to the resource we’re requesting. Then, after another space, we have the version of HTTP that we’re speaking. HTTP version 1.1 happens to be the latest accepted version of HTTP, so we’ll simply use that. Now it looks like we pressed the “Enter” key, which creates a character called a carriage return, so we started up a new line. Starting on this new line, we’ll have a series of key-value pairs called headers, one per line. Remember, key-value pairs are ways to pass along additional information using any number of parameters we want. Here, we’re only passing one key-value pair, in which we tell the server that the value of “Host” is “www.facebook.com.” This value is essentially the rest of the URL that we’d like to access. While the path goes in the first line of the HTTP request, the domain that the request should be sent to is passed along as a separate (non-optional) key-value pair. Why did I decide to do that? I didn’t! This is something that’s been specified by HTTP, so in order for my HTTP request to be valid, I have to follow HTTP’s guidelines. I don’t make the rules, I just enforce them.
We can use a program called telnet to write our own HTTP requests. Telnet should already be installed on Macs, and you can enable it on Windows via these steps. If we open a Terminal and enter…
telnet facebook.com 80
…then we should see a prompt where we can start typing an HTTP request. That 80 is the port we’ll be connecting to. Back when we looked at NAT, we mentioned that requests had a source port. Many protocols also specify a destination port to which requests should be sent. If different protocols are listening for messages on different ports, then we can run many different services on the same machine without running into any confusion! Let’s type in that HTTP request that we just saw and press enter. This will send an HTTP request to http://www.facebook.com/home.php, and we should soon receive an HTTP response in return.
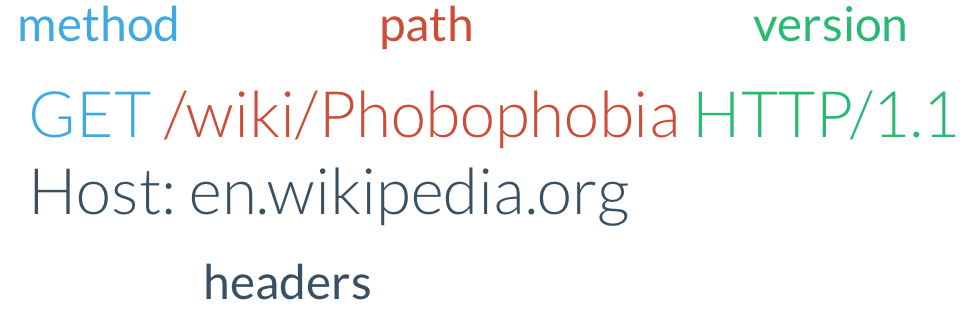
Here’s another example of an HTTP request, this time with its various components labeled. Notice that this one is a request for http://en.wikipedia.org/wiki/Phobophobia, a web page about phobophobia, the fear of fear.
HTTP Responses
Once the server receives an HTTP request, it has to decide how it should handle it. Based on our earlier HTTP request, it looks like the server might have to do something with a file called home.php. Eventually, the server will be ready to send us some data to respond to our request. Not only does HTTP standardize how requests should be made, but it also describes what responses to requests should look like. The HTTP response is divided into two parts: the headers and the body. First, let’s look at the headers, which could look something like this:
HTTP/1.1 200 OK
Date: Wed, 30 Jan 2013 21:43:11 GMT
Server: Apache/2.2.22 (Fedora)
Content-Length: 2422
Content-Type: text/html; charset=UTF-8
Connection: close

hello!
This looks a bit like the request we sent to Facebook earlier, since this response is also using HTTP. On the first line, we again have the version of HTTP we’re using, which is still 1.1 (since there isn’t really a reason to use anything else). After that we have the HTTP response code, also called the status code, which tells us whether or not something went wrong with the request. In this response, it looks like everything went well, since we received the code 200 back, which corresponds to a status of OK. If we instead had made a request to a page that doesn’t exist, like http://www.facebook.com/asdf, the first line in the HTTP response would look something like this:
HTTP/1.1 404 Not Found
Here, we received a different status code: 404. HTTP dictates that this response code should be sent when a request is made to a URL that doesn’t actually point to a valid resource on the server. So, it’s up to the web server to decide whether or not a request was successful and send back the appropriate status code. Here are a few other status codes that you’ll commonly encounter on the web. You can also browse a more complete list here.
| Status Code | Status Text | Meaning |
|---|---|---|
| 200 | OK | The request was completed successfully. |
| 301 | Moved Permanently | The resource at this URL has moved, so use a different URL in the future. |
| 302 | Found | The resource at this URL has moved temporarily. |
| 400 | Bad Request | The request didn't follow the rules of HTTP. |
| 401 | Unauthorized | You'll need to log in to access the resource at that URL. |
| 403 | Forbidden | You are not allowed to access the resource at that URL. |
| 404 | Not Found | The resource pointed to by that URL doesn't exist. |
| 500 | Internal Server Error | The server has encountered an error and cannot properly respond. |
As you can see, the first digit of status codes can be used to categorize what the status code means. More broadly, status codes can be broken down into these categories:
| First Digit of Status Code | Category |
|---|---|
| 1 | Informational |
| 2 | Success |
| 3 | Redirection |
| 4 | Client Error |
| 5 | Server Error |
Phew, that was a lot of status codes, so let’s move on and come back to them a little later. If we look back at our original HTTP response, we can see that after that first line are again a series of key-value pairs, one per line. However, while we only sent one key-value pair in our request, it looks like we got back a whole bunch of key-value pairs in the response. The first pair is pretty simple: this is simply the date and time at which the request was completed. Next, we have some information about the web server that responded to our request. In this case, it looks like the server is running software called Apache, which is responsible handle these HTTP requests as they come into the server. In parenthesis, we can see that this server is running Fedora, a form of Linux, as its operating system. As you might expect, if we instead send an HTTP request (using the same telnet command as before!) that looks something like this…
GET / HTTP/1.1
Host: www.microsoft.com
…included in the response is a key-value pair that instead looks like this:
Server: Microsoft-IIS/7.5
Here, this server is running version 7.5 of Microsoft’s IIS server software, which is simply an alternative to Apache. Not all servers will include the “Sever” key-value pair, since the client doesn’t really care about what kind of server responded to the request. In fact, this can be a bit of a security risk. Let’s say an attacker knows of a vulnerability in a particular server version; if your server broadcasts this information to the world, then the attacker knows whether or not you’re susceptible!
Moving right along, the next two lines of the HTTP response look like they have something to do with the contents of the response. First, we have the Content-Length header, which tells us how many bytes long the server’s response will be. Here, 2422 bytes is around 2 kilobytes, which isn’t a whole lot of data. Then, we have the type of content that is being sent back. Back in our discussion of character encodings and ASCII, we said that in order for computers to be able to interpret bits of data, we needed to somehow specify how they were encoded. Here, we’re saying that the data that the browser is about to receive will be encoded using UTF-8, which means that our webpage can include snowmen and love hotels. Thank goodness.
The Content-Type header also tells us that the response will be textual data that represents HTML, or hypertext markup language. We’ll take a much deeper look at HTML once we get into web development much later, but for now, HTML is simply a language that allows us to express how a web page should be organized. Web browsers almost always allow you to view the HTML used to create the web page you’re currently looking at. On a web page, if you select “View Source” from your browser’s menu, you’ll be taken to a page of text containing the HTML for the website you’re reading.
Alright, almost done. The last of our HTTP headers simply says that once the browser has received the entire response, it can close the connection to the web server, since there won’t be any more data sent along until it makes another request. Finally, the HTTP response body, which comes after the response headers we just looked at, is the main content of the response. In our example, the server sent us back the textual message “hello!” If we were to actually visit Facebook’s home page, then the response body would instead contain HTML that can be displayed by your web browser and let you catch up with your high school friends. So, you won’t actually see any HTTP headers as you’re surfing the web using a web browser, as they’re used to provide additional information to the client. Most of the time, what the browser really cares about is the body of the response, since that contains the contents of the web page we’re visiting.
More on HTTP Requests
In the examples we’ve seen so far, we’ve sent an HTTP request with the goal of getting some information from a server. Often, though, we want to send along some additional information in our request to a server. For example, when we search the web using Google, we need to include some type of search query, or else Google won’t have any idea what we’re looking for. As we saw before, one way to send data to a web server is through the URL’s query string, which also holds key-value pairs. So, our HTTP request searching Google for cats could be:
GET /search?q=cats HTTP/1.1
Host: www.google.com
This looks just like the GET request we made to Facebook, except we have different values for the path and host. Based on this HTTP request, we’re looking for information at the URL http://www.google.com/search?q=cats. When performing a search query, our goal is still to get data from Google’s servers, since presumably they have some information about cats that we’d like to retrieve. So, we’re still using GET as our HTTP method.
However, sometimes we want to send some new information to a server rather than requesting some existing information. For example, when you log into Gmail, you need to send your email and password to Gmail’s server, which isn’t so much getting information as posting some new information. Rather than using the GET method again, HTTP instead defines a POST method for cases like this. An HTTP request using POST might look something like this:
POST /login HTTP/1.1
Host: www.gmail.com
Content-Type: application/x-www-form-urlencoded
Content-Length: 35

username=tommy&password=secret
The first line of this request looks just like our request from before, but our HTTP method is now POST rather than GET. Just like last time, the headers come next, and we’ll again need a Host header to specify the domain we’re contacting. This time, we have two additional key-value pairs that we didn’t have before, but they should look familiar. Because a POST request is designed to send data, we once again have to specify what kind of data and how much data we’re sending to the server. Finally, we have the request body, which is just like the response body we saw earlier. You’ll notice though, that our request data looks just like a URL query string, even though it’s not actually stored in the URL. For this to work, we also had to specify a Content-Type of x-www-form-urlencoded above. While this query string format is only one way of transferring data, it is among the most frequently-used way of including information in the body of a POST request. In fact, if you’ve ever filled out a form online, there’s a good chance that the POST request created by your web browser used this content type to transfer data—that’s where the www-form part comes from!
HTTP in the Browser
Most web browsers allow you to view the HTTP requests and responses that result from loading a web page. In Google Chrome, clicking the menu at the top-right and selecting Tools > Developer Tools should bring up something like this:

Looks like simply going to Google’s home page generated a lot of network traffic! Some of this should look familiar to you, though. In the leftmost column, we have the name of the resource that was requested by the browser. Looks like our first request downloaded the HTML for Google’s homepage, which tells the browser what should be displayed. In the next column, we can see that an HTTP GET request was used to get Google’s homepage, which makes sense because we’re simply requesting existing data on the server rather than sending it some new data. Next, we can see the status code and corresponding text, and since the homepage was downloaded without any issues, we got back a 200 OK status code. The next column is the content type of the response, which we’ve already said is HTML. Finally, we can see how large the response was in kilobytes, as well as how long it took the browser to download the content.
However, based on the above, it looks like our browser used more than just one HTTP request to load google.com. After downloading the HTML for http://www.google.com, the web browser realized that it didn’t have all of the data necessary to fully display the page. For example, it looks like the HTML the downloaded by the browser contains links to some images, such as the Google logo we’ve all come to know and love. However, those images weren’t transferred with the HTML that came with in the HTTP response body, since remember, the response Content-Type said it was only textual HTML. So, the web browser actually has to go ahead and make new HTTP requests for each image the web page is trying to display. If we look towards the bottom of the above picture, we can see that the Google logo was transferred via a separate HTTP response, this time with a content type of image/png, or a picture. As we’ll see later, a web page’s HTML can also tell the browser to download other text-based files that change a web site’s appearance or functionality.
HTTP Performance
Though HTTP communication occurs between just two parties, a client and a server, large sites like CNN and Google actually have a huge number of powerful servers behind their websites, in order to deal with the high demand imposed by many clients making requests at once. As you’ve probably noticed, running a large number of programs at the same time on your home computer tends to slow it down, perhaps to the point where you’d rather watch paint dry than wait for an email to send. If thousands of people are hitting a website at the same time, then the same thing is going to happen, so we don’t want every single request going to a single machine that can’t handle them all. In the event a website’s servers become overwhelmed with the number of requests coming in, then the loading times for people browsing the site will start to increase. Even large websites suffer from this problem! Twitter, for example, has an amazing infrastructure capable of handling millions of Bieber fans tweeting at once, but during events like the Presidential Inauguration, their servers might reach capacity due to the gigantic number of requests coming in at once. Here are a few recently-released photos from Google’s data centers, showing just a small part of their incredible infrastructure:


Each of the lit-up rows in those columns is a server powering one of Google’s many websites! Crazy, right? Google’s data centers are located all over the world, so their servers can give you the fastest experience they possibly can. After all, you don’t want to have to wait for your request to travel all the way across the ocean every time you search for cat videos! The term latency is used to describe the delay that can occur as your request is traveling from point A to point B. Related to latency is bandwidth, which describes the maximum amount of data that can travel over a network at once. If your request is a car on a traffic-filled highway at rush hour, then latency describes the speed at which cars are moving, while bandwidth describes how many lanes the highway has.
Naturally, companies like Google want to mimize both latency and bandwidth. While locating servers as close to you as possible will reduce latency, decreasing the amount of data transferred to your computer will minimize bandwidth. If we head to http://google.com and then select “View Source” from our web browser, we can see the actual data that was transferred from Google’s servers. Looks like a big jumbled mess to me! However, this is actually intentional on Google’s part: they’re removed unnecessary things like whitespace and shorted words to minimize the amount of data that they have to send to your computer. Because these responses are small, each will take less time to reach your computer and reduce the traffic on the highway! (If only that were the case on Fridays at 5pm.) In addition to compressing the textual data that makes up a web page, many sites also combine all of the images on a page into one single image. For example, the home page of reddit contains several different cute alien pictures. However, using Chrome’s Developer Tools again, we can see that only a single image is downloaded, and it looks a little something like this:
![]()
Here, we have a bunch of icons combined into a single image, since it would be pretty wasteful for your browser to have to go and download each one of these small things one-by-one. These may seem like super minor changes, but keep in mind that they really add up! Even if Google saves just 100 bytes by compressing their home page, because that page receives upwards of a billion hits per day, Google ends up with hundreds of gigabytes of savings! So, for huge sites like Google and Facebook, every little bit (pun intended) matters, since any wasted data can end up costing a lot of money.
Let’s shift gears a bit. Now that we’ve taken a look at how web browsers send and receive information, let’s look at something else you probably use every day: email!