Chapter 18 A Web of Development
Introduction
It’s finally the moment you’ve all been waiting for… let’s make a website! In order to make snazzy-looking web pages, we’ll need to learn about two new things: HTML and CSS.
HTML
We’ve mentioned briefly before that web pages are written in a language called HTML, or HyperText Markup Language. HTML is not considered a programming language, though, since we can’t perform any kind of logic in HTML. Instead, HTML is used to represent the structure of documents. For example, a document might have a heading, a navigation bar, a bulleted list, and several paragraphs. Using HTML, we can represent the different parts of this document using ASCII text.
Using HTML tags, we can demarcate the different sections of our document. For example, we might represent a paragraph in HTML like this:
<p>This is a paragraph.</p>
Here, we’ve used the p, or paragraph, tag, to create a paragraph. In HTML, tags are always enclosed between angle brackets, so the tag <p> says “here comes a paragraph. After this start tag comes the actual text of the paragraph that will be displayed in the web browser. Because <p> is an HTML tag, it won’t actually be displayed by the browser. Finally, all good things must come to an end, and </p> is the end tag for the paragraph. For every tag we open in HTML, we’ll also need a corresponding closing tag. Together, these three things form a single element on the page.
Paragraphs are nice, and here are some other basic HTML tags you might want to know about.
b: Boldi: Italicsh1: Top-level headingh2: Subheading (these go all the way down toh6)
Often, we’ll nest tags inside of each other. For example, if we want to make text both bold and italic, we can do something like this:
<b><i>Text formatting gone wild</i></b>
We can also nest tags to create lists. The <ul> tag creates a new “unordered list” (aka bullets), and it can contain as many <li>, or “list items,” as you want. So, we can create a bulleted list in HTML like this:
<ul>
    <li>Item 1</li>
    <li>Item 2</li>
    <li>Item 3</li>
</ul>
Switching from an unordered list to an ordered list (i.e., one with numbers) is as easy as:
<ol>
    <li>Item 1</li>
    <li>Item 2</li>
    <li>Item 3</li>
</ol>
We can take a similar approach to create HTML tables. The <table> tag starts off a table, and we can define rows with the <tr> tag and cells with the <td> tag. Here’s a table with two rows and two columns.
<table>
    <tr>
        <td>Row 1, Column 1</td>
        <td>Row 1, Column 2</td>
    </tr>
    <tr>
        <td>Row 2, Column 1</td>
        <td>Row 2, Column 2</td>
    </tr>
</table>
Sometimes, we’ll want to specify some additional information to go along with a tag. Let’s say that we want to create a hyperlink on a web page, so when you click a piece of text, your web browser will whisk you away to somewhere else on the Internet. So, we have two things we need to specify: what the text of the link should say, and where the link should take you. To include both of these pieces of information into a single tag, we can use something called an attribute, which is simply a key-value pair inside of an HTML tag. Here’s how we can create a link using an <a> tag (where “a” is for “anchor”):
<a href="http://google.com">Click here to go to Google!</a>
Okay, here we have a single attribute called “href”. As you can see, the value of this attribute is a URL. Now, the text inside of the <a> tag is the text that will actually be displayed by the web browser, so the user can click on it.
Let’s take a look at another example. This time, we’d like to put an image on our web page, so we’ll use the <img> tag. Since we’ll be displaying an image, it doesn’t really make sense to put any text inside an opening <img> tag and a closing </img> tag. Instead, we’ll use an attribute to tell the web browser where the image we’d like to display is located. Here’s how we might display an image called cat.jpg:
<img src="cat.jpg" alt="This is a cat" />
Just like before, we’ve included a few key-value pairs inside the tag. The src attribute is a URL pointing to an image, and the alt attribute is the text that should be displayed when the user puts their mouse over the image (and is useful for accessibility reasons). Notice, though, that our tag ends with /> instead of </img>. This is simply a shortcut, since we know that there won’t be any text inside of our <img> tag.
Now that we have the basics down, let’s make a full-fledged HTML page. The first thing that we’ll need on our HTML page is a doctype, which is simply a short statement that tells everywhere that they’re about to read an HTML document. Our HTML doctype will look like this:
<!doctype html>
Looks a bit strange, but this isn’t actually an HTML tag. So, we don’t need something crazy like </!doctype html> anywhere, and the doctype is a one-time piece of text that we should include at the top of every HTML page. Next comes perhaps the most important HTML tag of all: <html>. This tag will surround our entire HTML document, since everything we write will be an HTML element!
Directly under the <html> tag, we have two tags: the <head> and the <body>. The <head> will contain some metadata, or additional information about the HTML, for our page. For example, we might want to include a <title> tag inside of the <head>, which gives the page a title to be displayed in the web browser’s title bar or tabs. Anything inside of the <head> tag is purely metadata, so nothing in the <head> will actually be displayed by the web browser.
The <body> tag, then, is the meat and potatoes of our HTML document. Here, we’ll include all of our document’s snazzy HTML elements that we actually want to be displayed to the user. So, the basic skeleton of every HTML document looks like this:
<!doctype html>
<html>
    <head></head>
    <body></body>
</html>
Here’s a full-fledged example of an HTML document that uses a few of the HTML tags we’ve seen so far:
<!doctype html>
<html>
    <head>
        <title>Tommy's Cat Store</title>
    </head>
    <body>
        <h1>Tommy's Cat Store</h1>
        <ul>
            <li><a href="index.html">Home</a></li>
            <li><a href="about.html">About</a></li>
            <li><a href="cats.html">Cats</a></li>
        </ul>
        <h2>We love cats.</h2>
    </body>
</html>
CSS
HTML described the structure of our web pages, but it didn’t actually say anything about the aesthetics. To describe what our web page should look like, we’ll need something called CSS, or Cascading Style Sheets. A stylesheet is simply a list of stylistic rules that the browser can apply to a web page. The basic idea behind CSS is that we’ll first describe what elements we’d like to style, and then we’ll describe the different parts of the elements we’d like to change.
So, we’ll first select elements on the page to apply styles to using CSS selectors, which filter down an entire HTML document into a smaller set of elements to apply styles to. Before we take a look at those, though, let’s introduce two new attributes that can be used to categorize HTML tags. The id attribute gives us a way to uniquely identify any element on the page, and we can attach it to any HTML tag we want. For example, we might want to say something like:
<img id="cat" src="cat2.jpg" />
Now, only this image should have an ID of cat. We can also attach a class attribute to any HTML element on our page. Unlike IDs, classes don’t have to be unique, so we can use classes to group similar elements together. If we have a bunch of elements related to animals, we might attach a class of animal to all of them, for example. Not all elements having a certain class have to be of the same type, so we can apply our animal class to both an li and a table, for example. We’ll see why this can come in handy in just a moment.
Okay, let’s take a look at some CSS selectors. The most basic CSS selector might look something like this:
p
Well that was anti-climactic, wasn’t it? This super-simple CSS selector simply selects all of the <p> elements on the page. If we had said something like img instead, then we’d select all of the <img> elements on the page. That isn’t so fine-grained, so let’s look at another CSS selector:
#cat
We’re not tweeting, that hashtag (#) is actually part of the CSS selector. By starting our selector off with the “#” character, we’re saying that we want to select an element by its ID. So, #cat will select the element on the page with an ID of cat. Because we’ve said IDs should be unique, this CSS selector should only grab one element. Finally, let’s take a look at a third CSS selector whose specificity is in between these two:
.animal
As you might guess, this CSS selector will select all elements with the class animal. Because we’ve started our selector with the “.” character, we’re telling CSS that we’d like to filter elements by the class attribute.
Now that we have some elements, let’s style them! We’ll supply style rules via key-value pairs after specifying the elements we’d like to change. A full-fledged CSS rule might look something like this:
#cat {
    color: orange;
}
Okay, let’s break this down a bit. Our CSS selector is #cat, so we know that we’re going to be styling the element with the ID cat. Next, we have a pair of curly braces that demarcate the rules we’re going to apply to the elements matching our CSS selector. After that, we have a key-value pair that looks like it will set the color of the element to orange. Notice that this key-value pair ends with the semicolon character (;), which tells CSS that we’re all done specifying the rule. And that’s it! We just applied a style to an HTML element. Let’s take a look at another one:
.animal {
    width: 300px;
    background: blue;
}
Here, we’re applying a style to all elements with the class animal, since our CSS selector starts with a dot. This time, we’re specifying two rules inside of the curly braces, which means that we can manipulate multiple parts of HTML elements at once. With the first rule, we’re saying that all elements with the class animal will be 300 pixels wide, and with the second, we’re saying that they will have a blue background color.
We can also combine CSS selectors to be even more specific. Here’s an example:
#navbar a {
    font-size: 24px;
}
This time, we’re saying that we’d only like to style <a> elements that are located within an element with an ID of navbar. Notice how we have a space between our first selector and our second selector: that’s how we’re expressing that we’d only like to style elements that match the second selector if they’re contained within some element that matches the first selector. Here’s another example of combining CSS selectors:
h1, p {
    margin: 10px;
    border: 1px solid black;
}
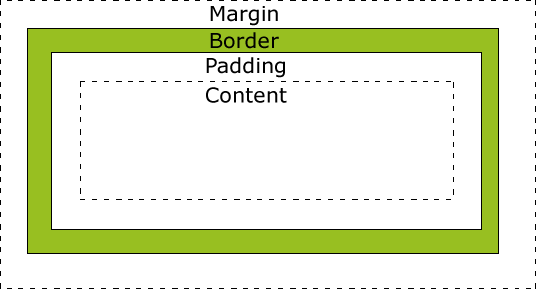
This time, we put a comma between our two CSS selectors, which means we want to apply styles to both <h1> tags and <p> tags. So, this rule will be applied to an element if it matches the first selector or it matches the second selector. By the way, the margin rule specifies how much space surrounds an element. In addition to margin, we also have padding, which is the space between an element and its border. Together, these three things can be described using the CSS box model, which looks something like this:
Alright, now that we’ve written lots of CSS, let’s take a look at how to actually integrate it into an HTML page. There are a few different ways we can apply CSS styles to HTML. The first is with the <style> tag; inside of a <style> element in an HTML document, we can simply write some CSS. Using this tag would look something like this:
<!doctype html>
<html>
    <head>
        <title>Tommy's Cat Store</title>
        <style>

            #navbar {
                width: 300px;
                display: inline-block;
            }

            #content {
                display: inline-block;
            }

        </style>
    </head>
    <body>
        <h1>Tommy's Cat Store</h1>
        <div id="navbar">
            <ul>
                <li><a href="index.html">Home</a></li>
                <li><a href="about.html">About</a></li>
                <li><a href="cats.html">Cats</a></li>
            </ul>
        </div>
        <div id="content">
            <h2>We love cats.</h2>
        </div>
    </body>
</html>
We can also apply styles via the style attribute. For example, if we want to make a single paragraph red, we could do something like this:
<p style="color: red">This paragraph is red</p>
Finally, we can put all of our CSS files into a separate CSS file. Then, using the <link> tag, we can apply the styles contained in some CSS file to an HTML document. Here’s an example:
<!doctype html>
<html>
    <head>
        <title>Tommy's Cat Store</title>
        <link rel="stylesheet" href="styles.css" />
    </head>
    <body>
        <h1>Tommy's Cat Store</h1>
        <div id="navbar">
            <ul>
                <li><a href="index.html">Home</a></li>
                <li><a href="about.html">About</a></li>
                <li><a href="cats.html">Cats</a></li>
            </ul>
        </div>
        <div id="content">
            <h2>We love cats.</h2>
        </div>
    </body>
</html>
Here, we’ve created a separate file called styles.css, and that file simply contains the set of CSS rules we’ve defined above. Using the href attribute of a <link> tag placed in the <head> of the HTML document, we’ve told the web browser to also take a look at a file called styles.css for some CSS rules to apply to the document.
And that’s it for the basics of HTML and CSS! Using these simple building blocks, we can create some amazing web pages.